Squeeze every last drop out of GMaudio Squeeze!
Squeeze every last drop with GMaudio GMaudio Squeeze is a Multi-band Upward Compressor. Its effects can range from normalization and loudness enhancement, to complete sonic
A question that regularly comes up is “how do I use a clipper” or “how does a clipper differ from a limiter”.
We will answer both these questions and more in this article, comparing my latest device, GMaudio Clipper 2.0 to Live’s Limiter.
If you would like to learn about what makes GMaudio Clipper 2.0 the best clipper for Ableton Live, then click here.
Before we discuss the How and Why, it’s important to note the fundamental differences in operation of these two devices.
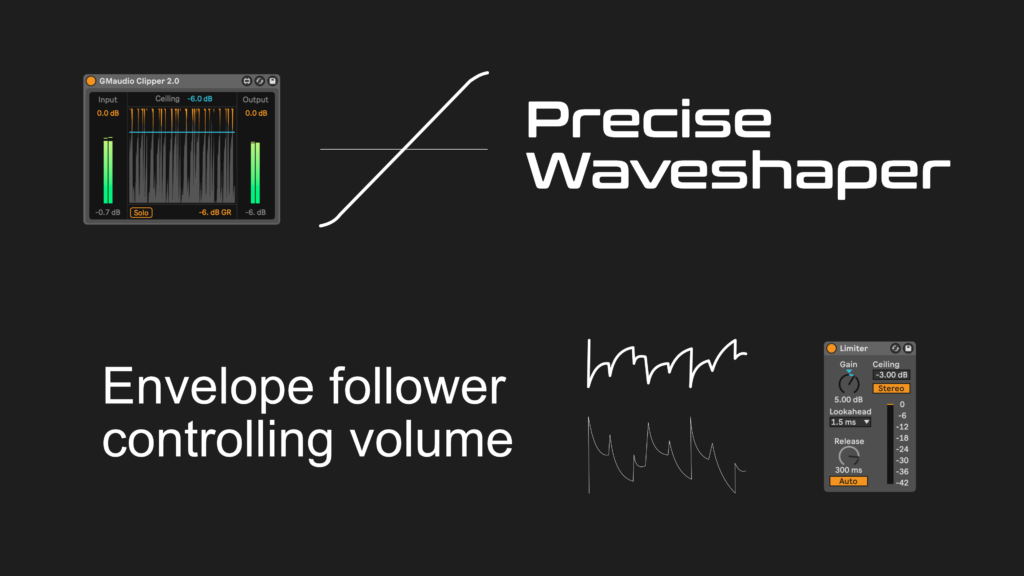
A clipper is a wave-shaper, it takes the incoming signal and reshapes certain parts of the waveform to conform to the desired output, this reshaping of the waveform introduces distortion. There are no attack, release or lookahead controls, because the changes are made instantly. Live’s Saturator is another example of a wave-shaper.
A limiter however, follows the envelope of the incoming signal, then applies smoothing to this envelope, and uses that to control the amplitude of the incoming signal. The amount of smoothing applied to the envelope is based on the attack and release settings. The attack of a limiter is normally set by the amount of look-ahead, which is usually very short. The release is often controlled by the user and is much longer. This smoothing is applied to reduce the amount of distortion that limiting introduces, if it had no smoothing, then it would essentially be a clipper.
Modern mastering limiters can be far more complex than this and often include a combination of multi-band processing, clipping and limiting, but this is not essential to our discussion.

The picture above displays a kick drum that has been clipped using GMaudio Clipper 2.0 (top) and limited using Live’s Limiter (bottom). The semi-transparent underlay is the original waveform. The vertical line signifies the peak in the original waveform.
In the top waveform, you can clearly see that it follows the original waveform perfectly while it is below a certain point, above that, it shapes the signal slightly before clipping it completely. This is known as soft clipping, as it introduces less distortion and sounds more pleasant, opposed to hard clipping. GMaudio Clipper uses a 4dB knee which means it begins to reshape the signal when it reaches 4dB below our ‘Ceiling’. These changes result in sharper edges on our waveform, introducing higher frequencies to our signal.
You can see that the bottom waveform begins more softly, this is due to the 1.5ms of lookahead and the limiter turning down the amplitude before the peak is reached, changing the shape of our waveform and therefore introducing a different kind of distortion, one that can make things sound dull. It also attempts to maintain the original oscillations of the waveform but does change them slightly, introducing distortion, and continues to affect the sound long after the signal drops below our ‘Ceiling’, shown further in the next picture.
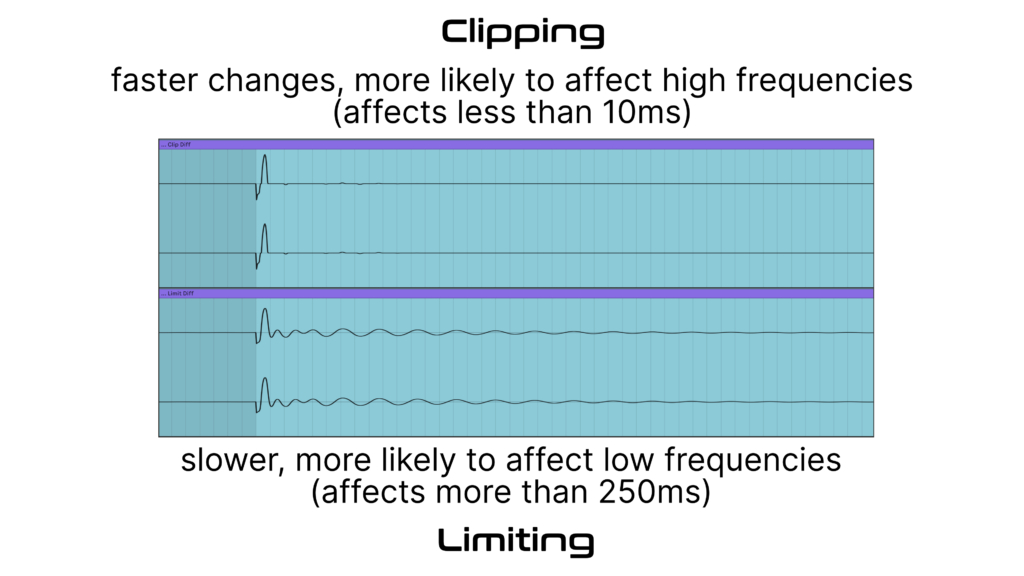
This picture displays the difference between the processed and unprocessed signal, clearly showing the changes we’ve discussed. The changes made by the clipper are very short and a little more jagged, as expected, but now we can clearly see that the changes made by the limiter continue for much longer and are therefore more audible.
Because a clipper is fast, when used sparingly, it generally only affects mid to high frequencies, this is because fast changes in a waveform mean higher frequencies. Therefore we can use a clipper to truncate these very short and abrupt, high level changes, switching them out for more frequency content, adding bite to the affected parts of the signal. This extra bite excites more parts of the ear, giving the impression of more volume, while maintaining the original low level and low frequency oscillations completely.
However, a Limiter is slow and much more likely to affect the entire signal, reacting differently depending on the signal. It might not soften the start of our sound audibly, because those changes can happen very quickly, but as the limiter continues to control the amplitude after the initial peak, it can reduce the average volume perceived by the listener, making things feel quieter. When you compare these two processes directly, you can clearly hear these differences, as my examples at the end will show.
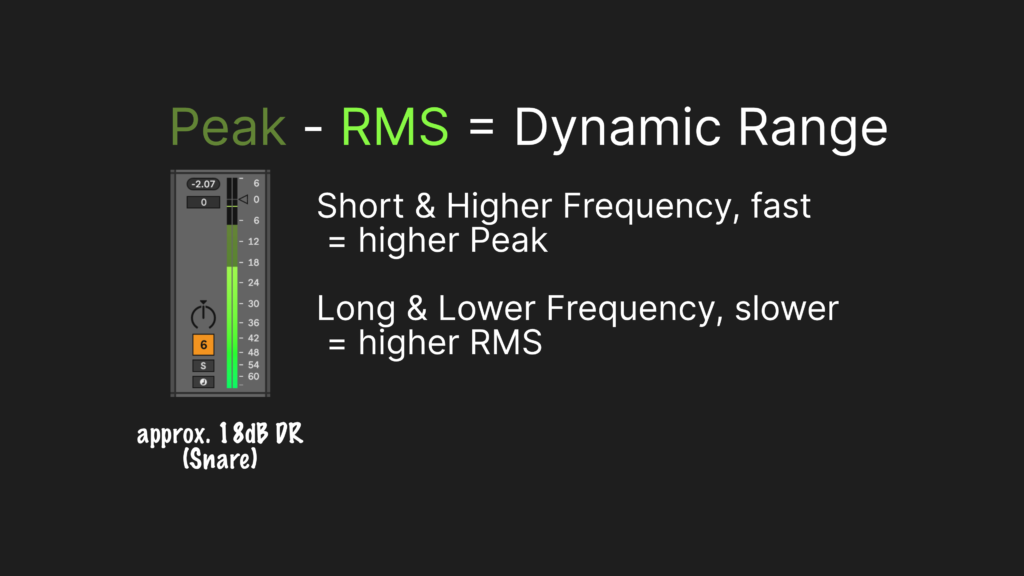
As we mentioned previously, A clipper works better when it is used on very fast changes in amplitude. An easy way to see if an instrument or track could benefit from any type of dynamics processing (saturation, clipping, compression or limiting), is by looking at the Track meters in Live’s session view.
The dark green meter shows the peak amplitude, whereas the bright green meter shows average amplitude or RMS. Because lower frequencies are slower, they are more likely to increase RMS or average amplitude, whereas high frequencies are fast changes, increasing the Peak amplitude. The difference between the average and peak amplitude is known as Dynamic Range, and on this snare there is approximately 18dB of Dynamic Range, signifying opportunity for dynamics processing. Anything showing Dynamic Range greater than 6dB may benefit from dynamics processing.
Instruments where this commonly occurs is percussion; kicks, snares, claps and hats, as well as percussive synth parts such as stabs or arps. We can often use a clipper to truncate half of the Dynamic Range from these sounds (thats up to 9dB using our Snare example above) and enhance their transient details, providing us with more headroom and the ability to turn things up louder or adjust the level more easily to fit our mix. If there is limited dynamic range in these sounds already, then clipping will only add more distortion, reducing the contrast between soft and hard sounds, leading to a less exciting mix.
Groups are another place we can use a clipper, generally in much smaller amounts. A group of percussion instruments is a great place to start, but synth groups may work well also. When used here you should aim for much less Gain Reduction, approximately 3dB can work well, as to maintain the contrast in our mix. Also, Clippers tend to work best at the end of a device chain.
A limiter is best used when the signal is less predictable, dynamics are less important, and we want to keep distortion to a minimum. A guitar or vocal might be a good place for a limiter to maintain their neutrality and easily control their amplitude. A group or full mix with lots of long dynamic changes may be another place for a limiter, so we can maintain a consistent amplitude and prevent hard clipping.
Because limiters are more complex than Clippers, they come in many different forms. Simply put, different limiters sound very different. However, we can be certain that they will affect more of the signal over time, so it’s imperative that any tonal changes they impart are exactly what we are looking for.
Here are two audio clips. One of them uses clippers instead of limiters on the percussion instruments (kick, snare, breakbeat, shaker), arp, percussion group and the master track.
Can you tell which is which?
Just like Limiters, not all Clippers are created equal.
GMaudio Clipper is now the best solution for clipping in Ableton Live, and in this article I’ll explain why.
But now you know how to use it, why wait?
Squeeze every last drop with GMaudio GMaudio Squeeze is a Multi-band Upward Compressor. Its effects can range from normalization and loudness enhancement, to complete sonic
There’s no getting around it, mixing electronic music is hard! In this first article I want to highlight what exists when we experience sound while presenting ideas for bringing your music to life!
What makes GMaudio Clipper 2.0 the best clipper for Ableton Live? Its industry leading oversampling of course, making it the first max for live device of its kind, but what does that actually mean?
Are you wondering “how do I use a clipper” or “how does a clipper differ from a limiter”? Then look no further. We will answer both these questions and more, as we compare clippers versus limiters.
Here are 10 steps you can follow to learn Ableton Live, inside and out!
Create complex melodic patterns from a simple, one note input.
One Response
I recently uploaded a video explaining these diagrams and the tests from my other clipper article, which hopefully provides more clarification.