Squeeze every last drop out of GMaudio Squeeze!
Squeeze every last drop with GMaudio GMaudio Squeeze is a Multi-band Upward Compressor. Its effects can range from normalization and loudness enhancement, to complete sonic
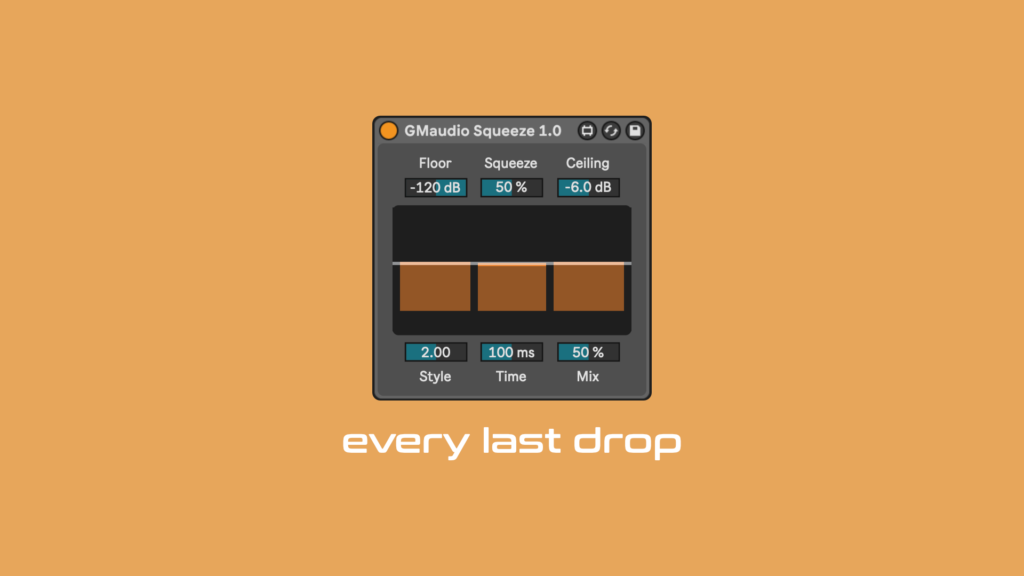
GMaudio Squeeze is a Multi-band Upward Compressor.
Its effects can range from normalization and loudness enhancement, to complete sonic destruction.
But in this article we’re going to discuss it in depth, so you can squeeze every last drop out of GMaudio Squeeze!
The conception of this device is quite interesting and demonstrates how modern music is influenced,
not only by technology, but also internet culture.
First let’s start with OTT, or Over The Top, the famous preset for Live’s Multiband Dynamics. It was so popular in EDM and Bass music that Xfer Records created their own plugin version that you can download for free (It was their second plugin after LFO Tool). There’s other iterations of it as well, like Bram Bos ‘WOOTT’, which is now a Universal AUv3, so it works on Mac and iOS. Safe to say it has history and it has touched years of electronic music by this stage, chances are some of your favourite artists have used it at least once.
I thought it was a bit silly at first and that the name was well suited, but over the years the concept of it grew on me and I made my own presets that considered its effects. Multiband Dynamics is a great device and a very welcome addition to Live’s native effects library but I always had some issues with it, which is why I developed PentaComp, and now Squeeze. My main issues were that it could not be used in parallel and that the interface was not very intuitive, not bad but not great.

I was actually working on a peak limiter when I stumbled across the concept of Squeeze. In my initial social media efforts I called it a peak expander because it was practically the exact opposite of what I was working on, but that was the incorrect terminology. I essentially had a very accurate brickwall peak limiter that was very low latency, sounded great and used very little CPU. My goal was to turn this into a multi-band limiter but I haven’t quite gotten there, as it’s difficult to develop a multi-band version and the final ceiling remain 100% accurate. Somewhat frustrated I was ‘dilly dallying’ in Max and thought, what If I divide the incoming signal by the detected peak level to normalize every single sample of audio up to 0dB! Squeeze was born…
When I showed this proof of concept to some users in my Discord, they said that it was like a Doom Compressor. I had seen the term and a device before, but it was much like OTT for me, quickly forgotten amongst the many jobs and tasks I seem to give myself. Regardless, I 100% accidentally created a Doom Compressor, albeit with a different implementation. The Doom Compressor was a sound designer’s way to achieve unruly and unheard sounds for the game, Doom. The definitive video on it can be seen here.
From there I developed Squeeze more deeply, so I had a point of difference over every similar product I could find, something I pride myself on since delving into the depths of digital signal processing in recent years. First thing on my list was to create the crossover filters for multi-band processing. I wanted the multi-band processing to balance the signal closer to pink noise (which is theoretically perfectly balanced) as well as work well in parallel.
6dB (or first order) crossovers are the simplest, you get outputs that are in phase, great for parallel processing and only require a crossfade to blend from single band to multi-band operation. To find the crossover frequencies, I ran pink noise into the 3 band crossover and adjusted the frequencies until I got a small and manageable difference between each band in LUFS. This allows Squeeze to balance the signal perceptually closer to an ideal balance, but from there I adjusted the levels at which Squeeze normalises to for each band, so that it resembled the famous mid scoop of OTT, but less prominent.
From there, I added the ability to set the Floor and minimise Squeeze’s effects, then noticed I needed an adjustable ceiling to get better control when using lower ‘Mix’ values. All that was left then was to create a visualization of the parameters to make it easier for people to understand the effect of the parameters and scale the parameters to have a wide usable range. After all this, we arrived at the public release version of Squeeze!
There are no rules for using Squeeze. Surprisingly, It’s been great to bring up the tiniest of details from my other devices allowing me to hear where things can be improved. Universe is one of these devices, as you can hear the quantization noise of the filters being modulated due to the filters being from Max’s standard object library and not coded from scratch in gen~ to accept modulation (like I’ve done in recent times). My point being, if there’s any little detail that you want to zoom in on that is low amplitude, Squeeze can make it incredibly obvious.
Time based effects are a goldmine with Squeeze. Delay, Reverb, Chorus-Ensemble, Corpus, Echo, Phasor-Flanger, Shifter, Grain Delay, Hybrid Reverb (especially weird convolutions), Resonator, Spectral Resonator, Spectral Time & Vocoder are all amazing. There is a lot to explore here but the nuggets of gold are in the subtleties, the right parameter values, effect combinations and a moderate dry/wet can add an otherworldly sonic aesthetic to your sound. Erosion is also cool for adding some extra top end sizzle, and Jitter from Redux can soften and excite the high frequencies making some things more palatable and prominent. I’ve made a quick rack for this so you can try it for yourself called, ‘FS – Sizzle’.
For any of this to work, Squeeze should be the last effect in the Device Chain. Choosing the right sound to begin with also helps. Anything that is recorded with from hardware sounds amazing, as all the minute details are brought up, such as ambient or electrical noise. Samples of Drum Machines are great, but also Drift, as it is a virtual analog synthesizer and has remnants of noise like a real analog synthesizer. Once you have your sound source and Squeeze after it, put any of the time based effects (mentioned above) between the two and explore the subterranean sonic landscape.
Saturation effects can also be cool (as seen above and in my Youtube Short), with Biasing (Saturators Colour Parameters) making a huge difference to the final output. However, they are very dependent on input signal and may not always yield instantly awesome results. Definitely worth checking out though and if you find something interesting, let us know!
Now, because Squeeze works on peak level, any dynamic effect (Compressor, Limiter, Saturator) can change how Squeeze processes a sound. What can be especially effective is using a Limiter just before, or after Squeeze in your Device Chain, to get a louder final result.
Below are some audio examples, with more details about each sound on SoundCloud.
I’ve also added 3 Audio Effect Racks as a single zip file to GMaudio Squeeze on Gumroad.
The last example is a bit unfair as it was designed with Squeeze from the very beginning, but it highlights its power. Let me know if you want me to break it down in a future video.
FS – Sizzle
Erosion followed by Redux for adding some stereo excitement to sounds.
Place before Squeeze anywhere in your device chain.
FS – Bass Modulator
Saturator, Vocoder, Notch Filter & Limiter for making Bass sounds more juicy.
Place before Squeeze in your device chain.
FS – Squeeze Lab 001
The FX Chain from my Youtube Short.
Place it after a Bass sound and before Squeeze followed by a Limiter or Clipper.
* These racks will only work with Live 11.
If you already have GMaudio Squeeze, you should have access to these via your Gumroad Library
~
Big ups to Ableton, CDM & Gearnews.de for sharing Squeeze!
Thanks for reading!
I hope these tips help you get more out of Squeeze. I will make a video exploring it even more at a later date.
If you find any cool combinations, be sure to leave them in the comments. Let us know what you think of the racks too 😁
Happy Music Making!
Squeeze every last drop with GMaudio GMaudio Squeeze is a Multi-band Upward Compressor. Its effects can range from normalization and loudness enhancement, to complete sonic
There’s no getting around it, mixing electronic music is hard! In this first article I want to highlight what exists when we experience sound while presenting ideas for bringing your music to life!
What makes GMaudio Clipper 2.0 the best clipper for Ableton Live? Its industry leading oversampling of course, making it the first max for live device of its kind, but what does that actually mean?
Are you wondering “how do I use a clipper” or “how does a clipper differ from a limiter”? Then look no further. We will answer both these questions and more, as we compare clippers versus limiters.
Here are 10 steps you can follow to learn Ableton Live, inside and out!
Create complex melodic patterns from a simple, one note input.

There’s no getting around it, mixing electronic music is hard!
In this first article I want to highlight what exists when we experience sound, while presenting ideas for bringing your music to life!
Firstly, we are dealing with instruments or samples that do not have a context or environment and it’s our job to create, or at least give an impression that a context or environment exists. For example, we might use a loop or sample that repeats, but in the natural world nothing is exactly the same, the entropy of our existence means that everything is constantly changing. To remedy this we add sounds that are constantly evolving alongside repeating sounds, or constantly change which sounds are repeating to imply that the sounds themselves are not static, all in an effort to trick our brains into believing that the music is real.
Have you seen this trick!? Use it to create interesting drones.
Another problem is that when we experience sound we are not exempt from an acoustic space. Therefore, if our goal is to create music that we can experience as real, then having all sounds exist within an acoustic space would be an effective solution. By this, I mean adding reverb to all sounds in a very delicate manner. More often than not we are in an acoustic space that has a reverb time of roughly half a second, it could reflect more or less high or low frequency energy, but it will always be stereo and evolving, as is any human auditory experience. By applying an indiscernible amount of similar reverb we can effectively make our sounds feel more real.
We can still add enormous and unrealistic reverbs to our music, even natural spaces can sound quite alien to us if we are not used to it, but this ambience style reverb provides a solid foundation for us to build upon and also provides further opportunity for creative expression or implying the music’s context or environment.
I currently only have 1 ambience preset in my Preset Pack, with more being added soon.
Speaking of isolation and experiencing sound, what about silence? Does it really exist? Human experience involves a number of sensory inputs and our brains determining what’s important. How do we know that removing one of those inputs won’t create an unnatural experience? When sitting in a silent room there are still a number of sounds present, the rustle of our clothing, the hum of an air conditioner, life bustling outside and electrical energy coursing through various circuits, all of which we can describe as noise, random vibrations with no discernable placement or path. If we apply a small amount of noise to our music then we can better emulate the human experience.
A technique I like to use is to have an ambiguous textural drone in the background and layer envelope-followed noise on top of my drum sounds, but it could be as simple as layering a field recording very quietly in your music or adding noise to a synthesizer’s oscillator.
Want to add noise to your music? Try GMaudio Noizyer

What else about life is random? Well, everything! We can not predict the future and we have no idea what is going to happen next, someone experiencing music is exactly the same. In fact it is the unfolding of experience that makes music so compelling. We like to think that we are in control but we are merely steering a ship, and for music to be captivating we need to provide the listener with some direction to maintain their interest, but on a molecular level we have no idea what’s going on and there’s no reason why this can’t be reflected in our music. Applying small amounts of random fluctuations or modulations could positively impact our objective of creating realism. This could be achieved using previous methods discussed but I suggest you try something more direct for yourself and make your own judgements.
I’ll update this later with a device for adding psuedo random fluctuations to your projects.
These are all things that can be clearly noticed by any individual with adequate hearing,
but what about the things we are not directly aware of that affect how we perceive sound?
This article has us scratching the surface of psychoacoustics, but in my next article we will delve deeper into the abyss
and try to make sense of the mechanics of auditory experience and how we can wield them more effectively.
To be continued…
Check out our other articles here
Squeeze every last drop with GMaudio GMaudio Squeeze is a Multi-band Upward Compressor. Its effects can range from normalization and loudness enhancement, to complete sonic
There’s no getting around it, mixing electronic music is hard! In this first article I want to highlight what exists when we experience sound while presenting ideas for bringing your music to life!
What makes GMaudio Clipper 2.0 the best clipper for Ableton Live? Its industry leading oversampling of course, making it the first max for live device of its kind, but what does that actually mean?
Are you wondering “how do I use a clipper” or “how does a clipper differ from a limiter”? Then look no further. We will answer both these questions and more, as we compare clippers versus limiters.
Here are 10 steps you can follow to learn Ableton Live, inside and out!
Create complex melodic patterns from a simple, one note input.

What makes GMaudio Clipper 2.0 the best clipper for Ableton Live?
Its industry leading oversampling of course, making it the first Max For Live device of its kind, but what does that actually mean?
I’m glad you asked! Because of the extra distortion that a clipper adds, it is very much at the risk of introducing Aliasing. Aliasing occurs when you try to sample (create and store) a signal that is higher in frequency than half of the sample rate, otherwise known as Nyquist. Whatever exceeds Nyquist is then folded back or mirrored into the original signal.
Aliasing is often louder in the high frequencies and can mask finer details in this area, it can be characterized as noisy, brittle and ‘digital’ sounding. To reduce aliasing we need to temporarily increase the sample rate, so the processing can take place without the risk of aliasing, then filter out any information that would otherwise alias, and return to the original sample rate.
Without going too deep, there are a number of ways this can be achieved but it usually involves performing the process a number of times and then interpolating the result, which requires the use of a low pass filter. This filter is applied to the audio signal and changes the sound, therefore the design of this filter will determine the sonic signature of the oversampling algorithm.
In filter design there are two main categories. IIR, or infinite impulse response filters, and FIR, or finite response filters. This is basically a fancy way of saying that one uses feedback and is therefore infinite, while the other does not and therefore must be finite.
IIR filters are usually simple, accurate and efficient. They can approximate simple analog filters with ease but often exhibit phase shift. FIR filters however, can achieve much more accuracy, but at the cost of efficiency. They can also have unique properties such as being Linear-Phase, meaning they will not change the phase at all.
In filter design, this Phase Shift refers to how much the timing of certain frequencies are affected. Phase Shift can colour the sound on its own, you only have to use something like Kilohearts Disperser to know how much of an effect it can have on a sound, mind you that is a very extreme case. Phase Shift is not always undesirable, but if you are trying to colour the sound as little as possible, Linear-Phase FIR filters are often a good choice.
Let me know in the comments if you would like me to discuss Phase Shift in more detail, in future articles.
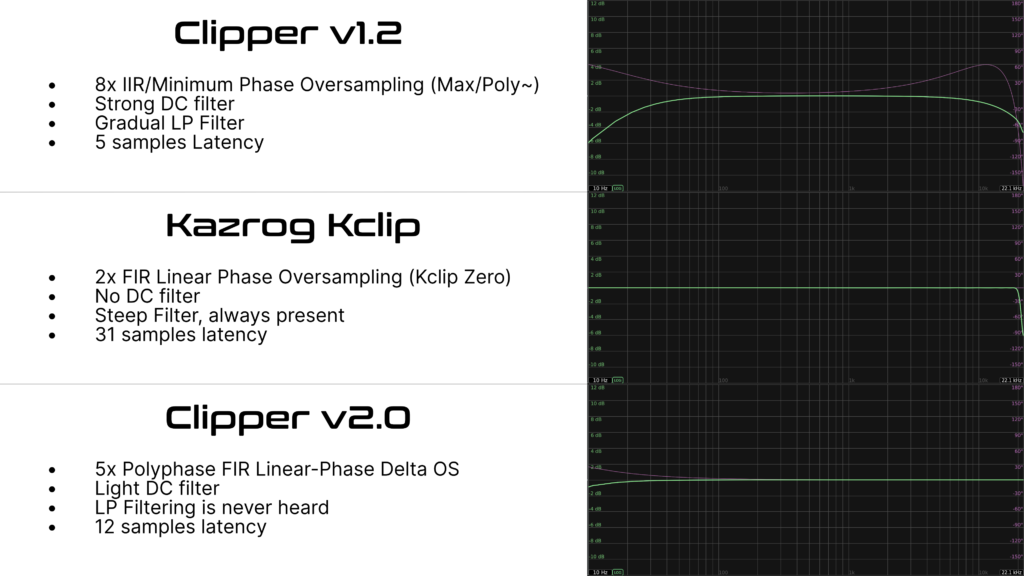
In this picture im using Bertom’s EQ Curve Analyzer to visualize the frequency and phase response of three clippers.
The first is GMaudio Clipper version 1.2, which uses an IIR low pass filter in the oversampling algorithm, much like the oversampling used in Live’s other audio effects. This oversampling is built into Max and is the only way someone can implement oversampling without writing their own code. The filter is more gradual than the other examples and a small amount of phase shift is present. The second is Kazrog Kclip Zero, a clipper which was recently released. It uses an FIR filter allowing it to be much steeper than an IIR filter and displays no Phase Shift.
Last is GMaudio Clipper version 2.0 which also uses an FIR filter in the oversampling algorithm but has extra steps to make the filter completely invisible unless clipping occurs. These extra steps are referred to as Delta Oversampling, it’s implemented in very few VST/AU plugins and never before in Max For Live, until now.
My previous article explains why this is useful.
Clipper is now at Version 2.4 which has many changes.
Delta Oversampling has its caveats and works best with light clipping,
now you can control exactly how much of the filter you want to disappear using the ‘FIR Remainder’ parameter.
All of these changes are explained here.
Both GMaudio clippers have a DC filter, this is used to remove any DC offset before clipping and ensures that the signal is centered around the zero crossing, so that the clipping is always symmetrical and the sound is more predictable. Clipper 2.0 uses a custom DC offset filter, which is basically a high pass filter at 0Hz.
The final comparison we can make here, is the amount of latency. Latency is the time it takes for the output to be ready for listening, if something has a higher latency, then it often means that more processing is taking place, which can translate into higher CPU usage. A longer FIR filter means increased accuracy but also higher latency, so there is usually a compromise.
The clipper using an IIR filter has a low latency of 5 samples, making it more suitable for real time use. Kazrog Kclip Zero has 31 samples of latency which is less than 1 millisecond, still very usable. GMaudio Clipper 2.0 only has 12 samples of latency, about a quarter of a millisecond, much less than Kclip and many other plugins, it achieves this using a Polyphase FIR filter.
Polyphase basically means that it’s split up into many steps. Using Polyphase FIR oversampling instead of the usual FIR oversampling, means that you can achieve the same length filter at a lower latency, or a longer filter at a similar latency. It can also increase the CPU efficiency of the oversampling algorithm. I designed the filter to be slightly less steep than Kclip and similar plugins, but it starts earlier and filters out more aliasing. GMaudio Clipper 2.0 is the first Max For Live device to ever implement Polyphase FIR oversampling.
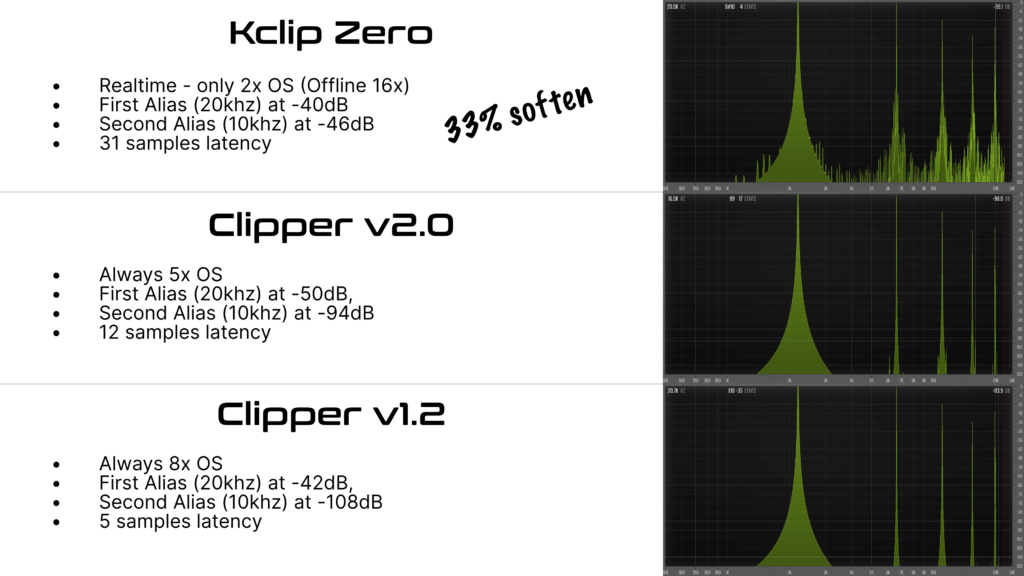
In this picture I used Voxengo SPAN to see the aliasing produced by a 2220 Hz sine-wave from Live’s Operator, with 6dB of clipping applied using each clipper.
Hard clipping introduces infinite harmonics so you would need an infinite amount of oversampling to remove it completely, luckily we are using soft clipping instead, but this still requires a considerable amount of oversampling to reduce it to an acceptable level. If no aliasing was present then there would be 4 additional peaks above the sine-wave towards Nyquist, and nothing else. Unfortunately, there is no standard for how much aliasing is acceptable, it depends on the developers goals and the users needs.
Kclip Zero only uses 2x oversampling, so it was always going to fail in comparison to GMaudio Clipper. Kazrog has done this to make it more CPU efficient and lower the latency for real time use but then increases the oversampling when exporting your track.
The problem with this, is that it will sound completely different, the filter will be relatively similar but the aliasing is very much audible during normal playback, influencing your mixing decisions. If you don’t know what it’s going to sound like when you export it, then you can’t make any clear judgments. With a Soften setting of 33%, the knee of this soft clipper is actually slightly more than the 4dB knee of GMaudio Clipper, therefore it should introduce less aliasing, but it still fails miserably during real time playback.
Clipper 2.0 oversamples 5x, meaning the clipping takes place at a much higher sample rate. The first aliased peak, or harmonic that has been folded back into the audio signal, sits at -50dB around 20khz, which is quite good compared to other clippers and is attributed to the design of the filter. The second alias peak is at -94dB which is very close to my goal of the aliasing being below -96dB, or lower than 16 bits.
Clipper 1.2 has 8x oversampling and therefore, the most aliasing rejection, but its first aliased peak is at -42dB because the IIR filter can not be very steep. This makes GMaudio Clipper 2.0 the ideal compromise with its excellent aliasing rejection at only 5x oversampling.
We’ve touched on some very complex topics, Filter Design, Digital Audio and Sampling theory as well as Digital Signal Processing. The result is that GMaudio Clipper 2.0 achieves an ideal balance of latency, CPU efficiency and aliasing rejection while being more transparent than other clippers out there. Best of all, it is easy to use and integrates seamlessly into Ableton Live’s device chain. This makes it the perfect solution for clipping in Ableton Live.
If you would like to learn more about how to use a clipper, then ready my article ‘Clippers Versus Limiters’.
All of these tests are performed with Ableton Live and free software, so they can be easily replicated. If you can find a clipper that has better aliasing rejection, less latency and CPU usage, for a lower price, whether it be a VST/AU plugin or Max For Live device.
Then contact me with details and I will give you a full refund. 
Squeeze every last drop with GMaudio GMaudio Squeeze is a Multi-band Upward Compressor. Its effects can range from normalization and loudness enhancement, to complete sonic
There’s no getting around it, mixing electronic music is hard! In this first article I want to highlight what exists when we experience sound while presenting ideas for bringing your music to life!
What makes GMaudio Clipper 2.0 the best clipper for Ableton Live? Its industry leading oversampling of course, making it the first max for live device of its kind, but what does that actually mean?
Are you wondering “how do I use a clipper” or “how does a clipper differ from a limiter”? Then look no further. We will answer both these questions and more, as we compare clippers versus limiters.
Here are 10 steps you can follow to learn Ableton Live, inside and out!
Create complex melodic patterns from a simple, one note input.
A question that regularly comes up is “how do I use a clipper” or “how does a clipper differ from a limiter”.
We will answer both these questions and more in this article, comparing my latest device, GMaudio Clipper 2.0 to Live’s Limiter.
If you would like to learn about what makes GMaudio Clipper 2.0 the best clipper for Ableton Live, then click here.
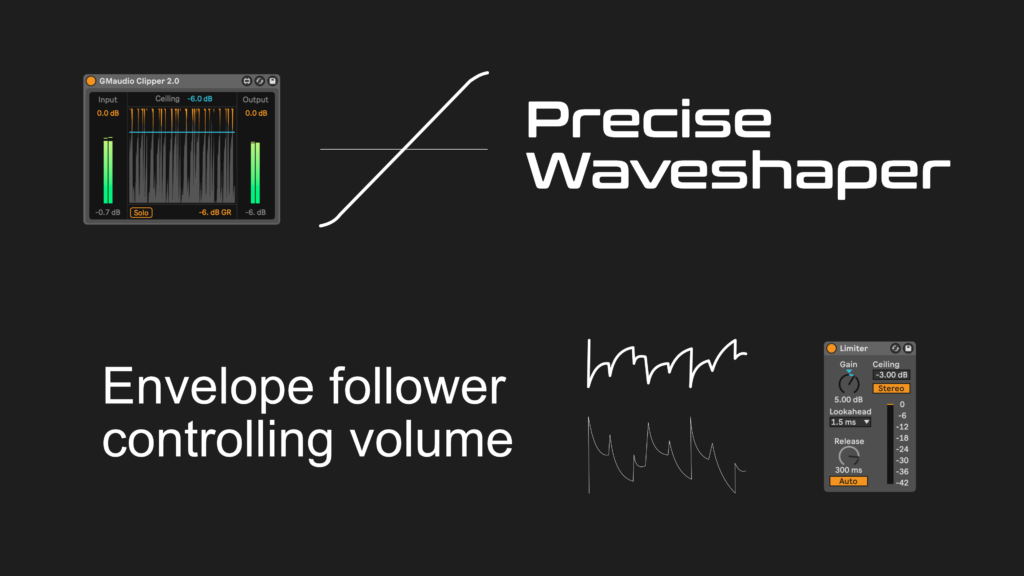
Before we discuss the How and Why, it’s important to note the fundamental differences in operation of these two devices.
A clipper is a wave-shaper, it takes the incoming signal and reshapes certain parts of the waveform to conform to the desired output, this reshaping of the waveform introduces distortion. There are no attack, release or lookahead controls, because the changes are made instantly. Live’s Saturator is another example of a wave-shaper.
A limiter however, follows the envelope of the incoming signal, then applies smoothing to this envelope, and uses that to control the amplitude of the incoming signal. The amount of smoothing applied to the envelope is based on the attack and release settings. The attack of a limiter is normally set by the amount of look-ahead, which is usually very short. The release is often controlled by the user and is much longer. This smoothing is applied to reduce the amount of distortion that limiting introduces, if it had no smoothing, then it would essentially be a clipper.
Modern mastering limiters can be far more complex than this and often include a combination of multi-band processing, clipping and limiting, but this is not essential to our discussion.

The picture above displays a kick drum that has been clipped using GMaudio Clipper 2.0 (top) and limited using Live’s Limiter (bottom). The semi-transparent underlay is the original waveform. The vertical line signifies the peak in the original waveform.
In the top waveform, you can clearly see that it follows the original waveform perfectly while it is below a certain point, above that, it shapes the signal slightly before clipping it completely. This is known as soft clipping, as it introduces less distortion and sounds more pleasant, opposed to hard clipping. GMaudio Clipper uses a 4dB knee which means it begins to reshape the signal when it reaches 4dB below our ‘Ceiling’. These changes result in sharper edges on our waveform, introducing higher frequencies to our signal.
You can see that the bottom waveform begins more softly, this is due to the 1.5ms of lookahead and the limiter turning down the amplitude before the peak is reached, changing the shape of our waveform and therefore introducing a different kind of distortion, one that can make things sound dull. It also attempts to maintain the original oscillations of the waveform but does change them slightly, introducing distortion, and continues to affect the sound long after the signal drops below our ‘Ceiling’, shown further in the next picture.
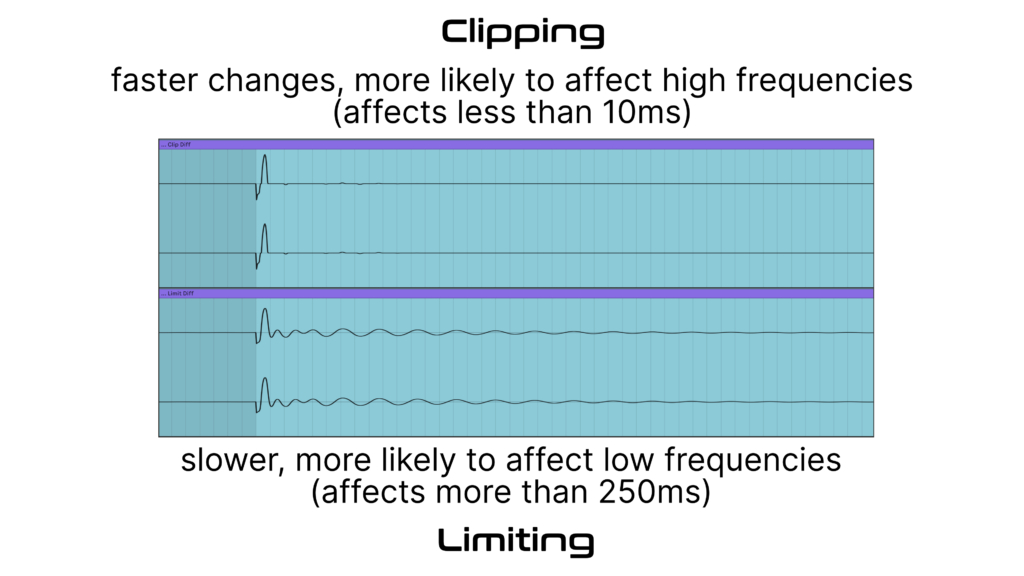
This picture displays the difference between the processed and unprocessed signal, clearly showing the changes we’ve discussed. The changes made by the clipper are very short and a little more jagged, as expected, but now we can clearly see that the changes made by the limiter continue for much longer and are therefore more audible.
Because a clipper is fast, when used sparingly, it generally only affects mid to high frequencies, this is because fast changes in a waveform mean higher frequencies. Therefore we can use a clipper to truncate these very short and abrupt, high level changes, switching them out for more frequency content, adding bite to the affected parts of the signal. This extra bite excites more parts of the ear, giving the impression of more volume, while maintaining the original low level and low frequency oscillations completely.
However, a Limiter is slow and much more likely to affect the entire signal, reacting differently depending on the signal. It might not soften the start of our sound audibly, because those changes can happen very quickly, but as the limiter continues to control the amplitude after the initial peak, it can reduce the average volume perceived by the listener, making things feel quieter. When you compare these two processes directly, you can clearly hear these differences, as my examples at the end will show.
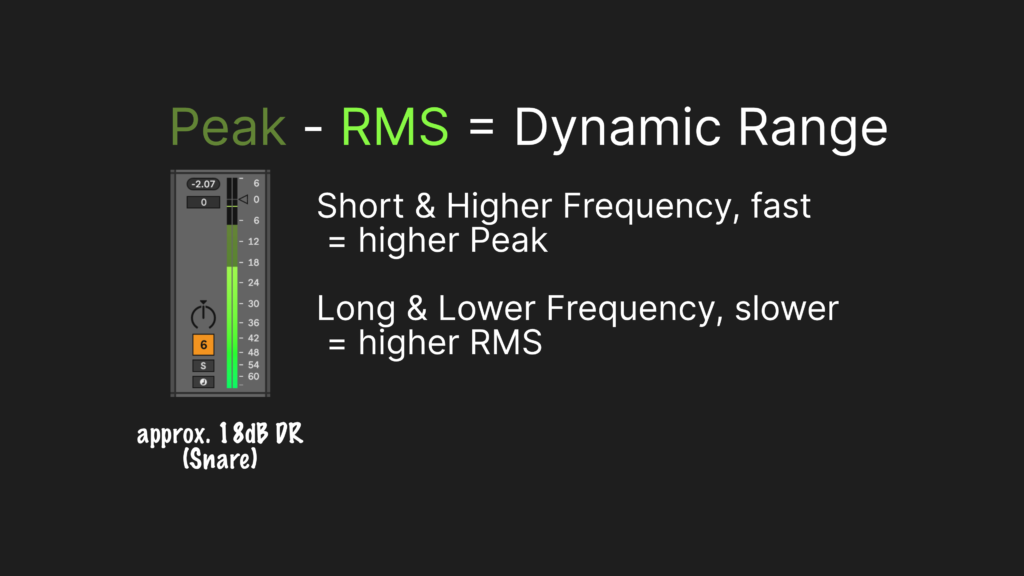
As we mentioned previously, A clipper works better when it is used on very fast changes in amplitude. An easy way to see if an instrument or track could benefit from any type of dynamics processing (saturation, clipping, compression or limiting), is by looking at the Track meters in Live’s session view.
The dark green meter shows the peak amplitude, whereas the bright green meter shows average amplitude or RMS. Because lower frequencies are slower, they are more likely to increase RMS or average amplitude, whereas high frequencies are fast changes, increasing the Peak amplitude. The difference between the average and peak amplitude is known as Dynamic Range, and on this snare there is approximately 18dB of Dynamic Range, signifying opportunity for dynamics processing. Anything showing Dynamic Range greater than 6dB may benefit from dynamics processing.
Instruments where this commonly occurs is percussion; kicks, snares, claps and hats, as well as percussive synth parts such as stabs or arps. We can often use a clipper to truncate half of the Dynamic Range from these sounds (thats up to 9dB using our Snare example above) and enhance their transient details, providing us with more headroom and the ability to turn things up louder or adjust the level more easily to fit our mix. If there is limited dynamic range in these sounds already, then clipping will only add more distortion, reducing the contrast between soft and hard sounds, leading to a less exciting mix.
Groups are another place we can use a clipper, generally in much smaller amounts. A group of percussion instruments is a great place to start, but synth groups may work well also. When used here you should aim for much less Gain Reduction, approximately 3dB can work well, as to maintain the contrast in our mix. Also, Clippers tend to work best at the end of a device chain.
A limiter is best used when the signal is less predictable, dynamics are less important, and we want to keep distortion to a minimum. A guitar or vocal might be a good place for a limiter to maintain their neutrality and easily control their amplitude. A group or full mix with lots of long dynamic changes may be another place for a limiter, so we can maintain a consistent amplitude and prevent hard clipping.
Because limiters are more complex than Clippers, they come in many different forms. Simply put, different limiters sound very different. However, we can be certain that they will affect more of the signal over time, so it’s imperative that any tonal changes they impart are exactly what we are looking for.
Here are two audio clips. One of them uses clippers instead of limiters on the percussion instruments (kick, snare, breakbeat, shaker), arp, percussion group and the master track.
Can you tell which is which?
Just like Limiters, not all Clippers are created equal.
GMaudio Clipper is now the best solution for clipping in Ableton Live, and in this article I’ll explain why.
But now you know how to use it, why wait?
Squeeze every last drop with GMaudio GMaudio Squeeze is a Multi-band Upward Compressor. Its effects can range from normalization and loudness enhancement, to complete sonic
There’s no getting around it, mixing electronic music is hard! In this first article I want to highlight what exists when we experience sound while presenting ideas for bringing your music to life!
What makes GMaudio Clipper 2.0 the best clipper for Ableton Live? Its industry leading oversampling of course, making it the first max for live device of its kind, but what does that actually mean?
Are you wondering “how do I use a clipper” or “how does a clipper differ from a limiter”? Then look no further. We will answer both these questions and more, as we compare clippers versus limiters.
Here are 10 steps you can follow to learn Ableton Live, inside and out!
Create complex melodic patterns from a simple, one note input.
There is a lot of information out there and some of it can be conflicting, so here are my top tips for ensuring your mix is in great shape, so you can get the best possible result from Mastering.
Silence at the beginning and end of your production…
When exporting your final mix, make sure there is silence at the beginning and end so the Mastering Engineer can perform fade in/out when Mastering.
If you’re using Ableton Live then you can use ‘Insert Silence’ in the ‘Create’ Menu to add time to the Timeline before your music starts and use the Loop Brace to easily select/deselect the region of the Timeline you want to export.
No Plugins on the Master…
Before exporting, make sure there is nothing on your master channel.
Some engineers will allow you to have some EQ and compression on the master if it is a part of your mixing process, but it is essential that there are no limiters or heavy compression used on your master channel when exporting.
If you’re unsure what is considered acceptable, ask your Mastering Engineer.
Is there is sufficient Headroom?…
Ensure that the peak level of your composition does not reach or exceed 0.0 dB on your master channel. If it does, then digital clipping will occur, which in most cases is undesirable.
A good rule is to allow 3dB of Headroom.
Headroom is the difference between the peak level and 0.0dB therefore, 3dB of headroom would mean that the peak level does not exceed -3.0dB on your master channel.
At the very minimum you should have 1db of headroom, that would mean that your composition would not reach -1.0dB peak volume at any any point.
It should be noted that the actual peak volume of your mix does not matter, as long as it is not incredibly quiet (below -20.0 dB peak) or exceed -0.1dB.
Balance your instruments carefully…
The volume of your instruments relative to each other is of the utmost importance!
A Mastering Engineer can make certain frequencies louder or quieter to make some sounds feel louder than others, but cannot change the overall volume of a complex instrument.
For example; If your Kick is too loud then it will make it difficult to process the Bassline and could even effect your other percussion. If your Kick is too quiet then this can affect multiple sounds as the mastering engineer has to drastically change the mix using eq, compression/expansion to bring the other sounds down and the Kick up to an acceptable level. Or, If your hats are too loud then that could negatively effect your lead synths etc…
If you’re unsure if an instrument is too loud or quiet, then listen to your favourite track in a similar genre to get an idea of how loud your instruments are in comparison.
Generally the Kick and Bass are the loudest instruments in a mix. Every other instrument should be balanced appropriately taking into consideration the length of the notes the instrument plays and what octave/frequency range the notes are in. For example; a main lead/melody would be louder in the mix than high pitched strings because its notes are shorter and lower in pitch than that of the string instrument.
Send the highest quality mix possible…
Make sure the file you send to the Mastering Engineer is of the highest quality possible!
Digital Audio has limitations and knowing these limitations will allow you to get the best possible result. Aliasing and Dithering are two important topics in Digital Audio.
Aliasing occurs when you try to record/store a frequency to a Digital Audio file (known as Sampling) that is more than half of the Sample Rate. That’s anything above 22.05khz if you are using a Sample Rate of 44.1khz. Synth Plugins and audio effects, such as Distortion, can often produce frequencies higher than 22khz which may not be apparent to you during your mixing process but can cause Aliasing in an exported file. Also, it typically sounds better to reduce the Sample Rate (Downsampling) than it does to increase it (Upsampling).
Therefore, it is recommended that you record and mix at a Sample Rate of 48khz and remove any unnecessary, high frequency information from your mix using a Lowpass filters on individual instruments. This will allow you to export at 48khz and minimize high frequency digital distortion known as Aliasing.
Here is a video by Dan Worrall explaining the use of different Sample Rates and as well as the Oversampling feature found in some Plugins: https://www.youtube.com/watch?v=-jCwIsT0X8M
Dither is the process of adding noise to reduce errors when Sampling (recording to a digital audio file). Most DAWs (Digital Audio Workstations such as Ableton, Logic) use a 64bit Mixing Engine but most audio effects are 32bit. This means that using any audio effects will instantly convert your audio to 32bit data.
Therefore it is recommended that you export your track at 32bit to avoid any unnecessary addition of noise to your final mix. If you only have the option to export at 24bit (such as older versions of Logic) then you should apply Dither when exporting your final mix to reduce errors.
Now you’re ready for Mastering!
You should end up with a mix that is well balanced and stored as a 48khz 32bit WAV or AIFF Digital Audio file with at least 1dB of Headroom.
What you will receive is a loud, punchy and pristine Master ready for distribution.
If you would like your music mastered by Fixation Studios, please Contact Us!